Mail Client Auto-Configuration
Have you ever wondered, how to make your self hosted or corporate mail configure itself in Thunderbird, Android, iOS, Outlook and all those other clients out there? Well it’s easy, these clients look for a XML-configuration file at a specific web-location and configure accordingly. We will be using the python package automx2, which supports the protocols Mobileconfig (Apple), Autodiscover (Microsoft/Outlook) and Mozilla-Thunderbird’s Autoconfig, which doesn’t seem to be documented anywhere, but the somewhat obscure MDN content archive.
Setup automx2
Automx also has some implicit python dependencies not directly mentioned in the documentation. Install those alongside the package itself. As of writing this article I am using Debian 11 Bullseye. Install the relevant packages and create a new user for automx:
pip install flask automx2
sudo apt install python3-venv
sudo adduser --create-home automx2
Download and execute the setup-script from the automx GitHub-project, as the user you just created in it’s home directory:
su automx2
cd /home/automx2/
wget https://github.com/rseichter/automx2/raw/master/contrib/setupvenv.sh
chmod u+x setupvenv.sh
./setupvenv.sh
Create a configuration file. It must be in the location ~/.automx2.conf . There is support for various other database backends, including MySQL, PostgreSQL and LDAP.
[automx2]
loglevel = DEBUG # or WARNING
db_echo = no
db_uri = sqlite:////home/automx2/automxdb.sqlite
From the newly created home directory, run the following command to test your setup, if there are no errors, execute an HTTP-request to the /initdb-location, to initialize the database:
FLASK_APP=automx2.server:app python -m flask run --host=127.0.0.1 --port 4243

# --- different console --- #

curl http://localhost:4243/initdb
Now you should be able to query the server for an auto-configuration file. In the example below, I also used xmllint from the Debian package libxml2-utils to format the output.
curl 'http://127.0.0.1:4243/mail/config-v1.1.xml?emailaddress=user@example.com' \
    2>/dev/null | xmllint --format -

# ---

<?xml version="1.0"?>
<clientConfig version="1.1">
<emailProvider id="automx2-1000">
    <identity/>
    <domain>example.com</domain>
    <domain>example.net</domain>
    <domain>example.org</domain>
    <displayName>Big Corporation, Inc.</displayName>
    <displayShortName>BigCorp</displayShortName>
    <outgoingServer type="smtp">
    <hostname>primary-smtp.1f3bc6a61abf4b01b29b77a696b4ebd8.com</hostname>
    <port>587</port>
    <socketType>STARTTLS</socketType>
    <username>%EMAILADDRESS%</username>
    <authentication>plain</authentication>
    </outgoingServer>
    <incomingServer type="imap">
    <hostname>imap1.6a8371bf05d74889b3ab8e5fc2486168.com</hostname>
    <port>143</port>
    <socketType>STARTTLS</socketType>
    <username>%EMAILADDRESS%</username>
    <authentication>plain</authentication>
    </incomingServer>
</emailProvider>
</clientConfig>
So, I will just mention this here: If you are a lazy person, you could just edit this file and put it into your public-facing web space at the same URL we got it from.
Otherwise we now have to configure automx, to return the correct server details, ports and supplemental information. The short version is:
define a ‘provider’ with a long and short name define your servers, for example your IMAP and SMTP servers/ports define a domain for your provider (one provider may have multiple domains) link your IMAP and SMTP configuration to your domain (one domain may have multiple servers)
# clear database #
DELETE FROM provider;
DELETE FROM server;
DELETE FROM domain;
DELETE FROM server_domain;

# define a provider #
INSERT INTO provider VALUES(100, "long_name_example.com", "short_name");

# define servers (imap + stmp) #
INSERT INTO server VALUES(101, 10, "example.com", 587, 'smtp', 'STARTTLS', '%EMAILADDRESS%', 'plain');
INSERT INTO server VALUES(102, 10, "example.com", 993, 'imap', 'SSL', '%EMAILADDRESS%', 'plain');

# link domain to provider #
INSERT INTO domain VALUES(110, 'example.com', 100, NULL);

# link servers to domain #
INSERT INTO server_domain VALUES(101, 110);
INSERT INTO server_domain VALUES(102, 110);
The second value you see in the ‘server’-table, is a priority. If you have backup servers for any of the protocols defined here, you may add them and assign a lower priority than the default server.
Run with System-D
In order to automatically run the server, we can create a systemd unit, start and enable it.
[Unit]
After=network.target
Description=MUA configuration service
Documentation=https://rseichter.github.io/automx2/

[Service]
WorkingDirectory=/home/automx2
Environment=FLASK_APP=automx2.server:app
Environment=FLASK_CONFIG=production
ExecStart=/usr/bin/python3 -m flask run --host=127.0.0.1 --port=4243
Restart=always
User=automx2

[Install]
WantedBy=multi-user.target
As you can see, the service is very straight forward, you may change the port or add addition ‘After’-directives if necessary.
mv automx2.service /etc/systemd/system/automx2.service
systemctl enable /etc/systemd/system/automx2.service
systemctl start automx2.service
systemctl status automx2.service
Run behind Nginx
Since those configuration files are kind of important information, they should be encrypted during transmission. Some of the auto configuration protocols even require this (iOS), but it is not strictly necessary if you only use Thunderbird. If you don’t have a working Nginx reverse-proxy with TLS configured, read this article first and then come back here. The automx2 specific configuration is straight forward:
server {

    server_name autoconfig.example.de autodiscover.example.de;
    listen 443 ssl;
    listen [::]:443 ssl;

    location /initdb {
        allow 127.0.0.1;
        deny all;
    }

    location /{
        proxy_set_header Host $host;
        proxy_set_header X-Forwarded-Proto http;
        proxy_set_header X-Forwarded-For $proxy_add_x_forwarded_for;
        proxy_set_header X-Real-IP $remote_addr;
        proxy_pass http://localhost:5014;
    }
}
The usage of the “autoconfig” and “autodiscover” subdomains can also be replaced by using the default domain and adding a “.well_known/autoconfig/” - location in the main server block.
location /.well-known/autoconfig/{
    proxy_set_header Host $host;
    proxy_set_header X-Forwarded-Proto http;
    proxy_set_header X-Forwarded-For $proxy_add_x_forwarded_for;
    proxy_set_header X-Real-IP $remote_addr;
    proxy_pass http://localhost:5014/;
}
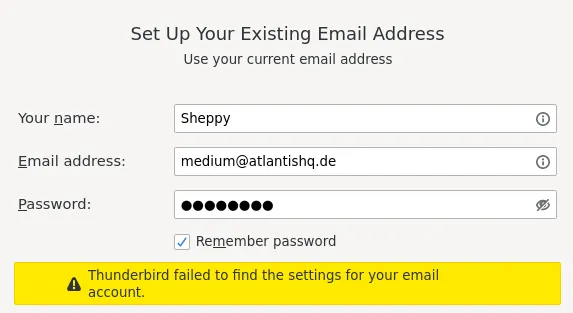
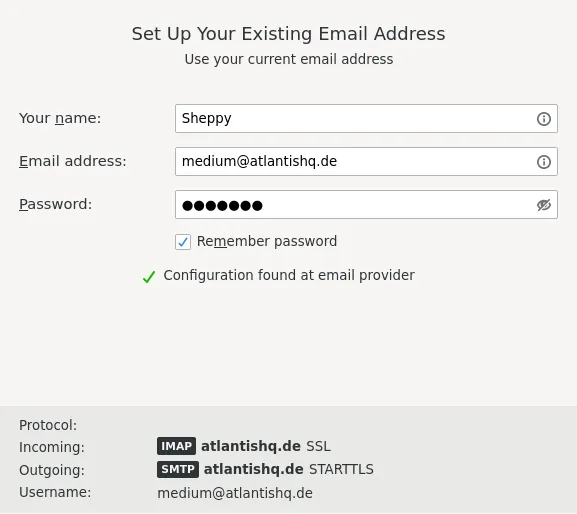
Test with a Mail Client
All that’s left to do now, is opening your favorite mail client and check if everything works.
In case it doesn’t work, Thunderbird is probably your best option for debugging. First, have the automx server running in an open console, so you are able to see the requests coming in.

Secondly, use the Thunderbird error console (Ctrl-Shift-J) to see the requests being sent on the client side.

Here you can also see the previously mentioned possibility of putting your configuration into a “.well_known” - location.
by Yannik Schmidt
Tags: Mail, Postfix, automx, IMAP, SMTP